
Not the boss you’re looking for? Check out the Vault of the Incarnates Overview for a list of all bosses and guides!
Introduction
Raszageth is the final boss of the Vault of the Incarnates raid, and as such is much more involved than all prior bosses. This guide is aimed at helping normal and heroic level encounters. There will be more images and a slightly different breakdown compared to previous fights in this Raszageth Guide. I’ll go phase by phase, show you a rough positioning, and what to expect from each phase, and then give some heroic changes at the end.
Phase 1
In phase 1 you begin in the center platform. Tanks will hold her as close to the center as possible, tank swapping with every cast of Electrified Jaws.
The boss will target random players with Static Charge. This debuff will leave a cloud behind after it expires, as well as deal damage to the raid based on distance. The further away they are, the less damage they will take. 1 player should place this directly behind the boss while the rest move it off to the sides of the raid.
Every 100 energy Raszageth will attempt to blow players off the platform with Hurricane Wing. Place yourself between Rasza and one of the clouds from Static Charge in order to get caught before you are blown off. Alternatively, you can use movement speed boosts to try and fight the wind.
Raszageth will overcharge players with Volatile Current. You must spread out before it discharges. Once discharged, it will summon a spark for every player. These must be interrupted, stunned, dispelled, or just killed. Failure to perform one of these actions will result in massive raid wide damage.
Dodge her Breathe Attacks and the Lightning Surges that she casts throughout phase 1. Compared to the previous abilities, these are much easier to avoid.
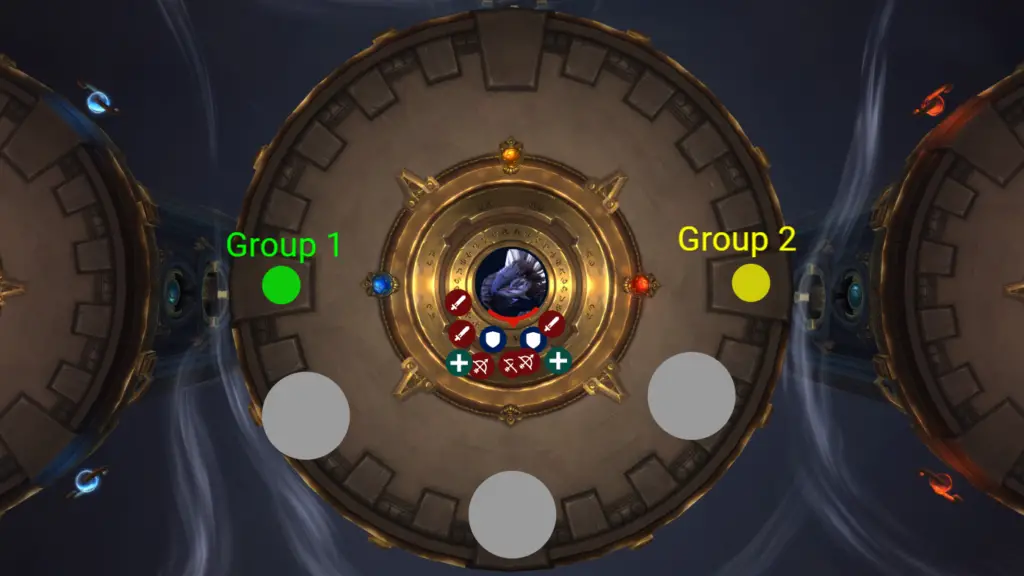
Once she reaches 65% health, Intermission 1 will begin. Half of your raid will need to be positioned to the West and East sides. When Raszageth takes off, she will knock players away and you want to land 50% on the west platform and 50% on the east platform.
Intermission 1
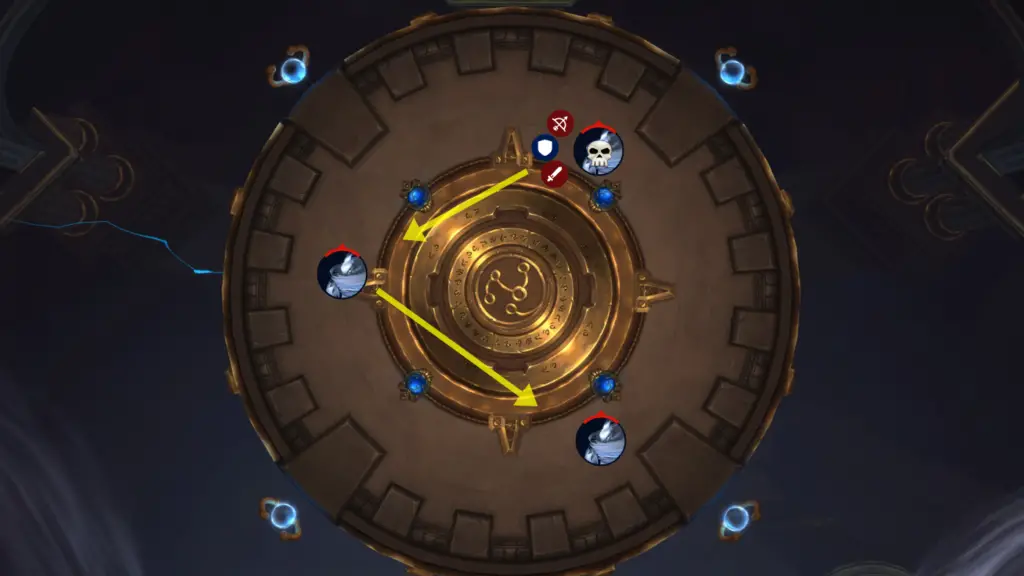
This is an Add heavy phase. Once your groups are separated and on their platforms, they will be required to kill 3 sets of adds. 1 large Storm Ruiner and many small casters are in each group. You will have to dodge Raszageths breathe attacks still as you navigate around and kill each group of adds 1 at a time. Beware of breaking too many Ruiner’s shields at once, as that will cause multiple instances of Overload. Once all adds are dead Phase 2 will begin. Get to the teleporters on each platform to be launched to Platform 3.
Phase 2
Phase 2 returns to us dealing damage to our favorite T-rex armed end boss. Your raid will meet up on the 3rd platform (North) to try and deal as much damage to Raszageth as you can before Intermission 2 begins. This phase will end when the vault reaches 50% stability, or Raszageth reaches 25% health. Whichever comes first.
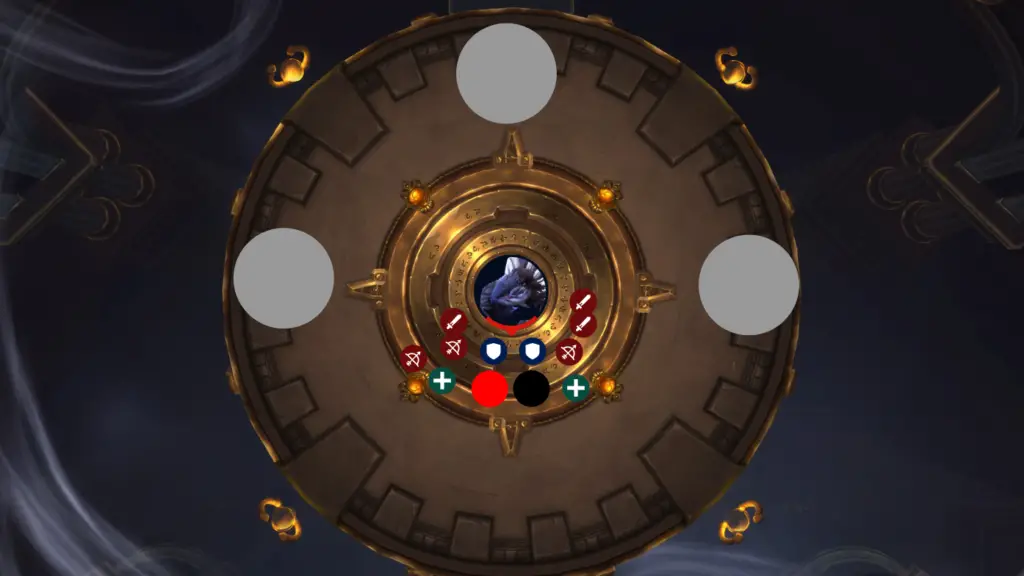
During this phase she will cast Stormsurge every time she reaches 100 energy. This will give her a huge shield, as well as mark half the raid as either Positive or Negative. Designate a place for members of each charge to stand and make sure to not cross the marks, as the result is deadly.
There is 1 other new ability this phase, and it’s Fulminating Charge. Rasza will mark a few players with a massive circle and slowing them greatly. When the debuff wears off, a smaller but more deadly version will bounce to every player caught in the radius. This continues until it expires without damaging anyone extra. To manage this, have the players spread out as if they are dropping Static Charge from phase 1, while every other player moves away as quickly as they can.
There is a baby version of Hurricane Wing you have to fight, and Volatile Current returns. Handle Volatile Current the same way as previous. Spread slightly, and kill/interrupt/stun the adds.
Intermission 2
Intermission 2 is fortunately much simpler than previous phases. There is a Colossal Stormfiend you must kill quickly. Every time they cast Storm Break the will split into multiple adds that must be CC’d and killed before you return your attention to the Colossal fiend.
You will have to contend with Raszageth’s breathe in this intermission as well. Keep your eyes to the skies and be ready to dodge.
Once the Stormfiend dies, position yourself to be knocked back onto the main platform (South) and prepare for your final encounter with Raszageth!
Phase 3
Phase 3 operates very similarly to Phase 1. Raszageth will be tanked in the middle of the room, she attempts to push you off the platform. Fulminating Charge from P2 is carried over to P3, and must be handled in the same way. The biggest change, is that the platform is slowly being engrossed by a storm. You must defeat Rasza before your raid is overcome!
Raszageth’s tank swap is now a cone called Thunderous Blast, so do not stand with the tank, and tanks must not stand together!
Healers should apply External Cooldowns to tanks, and tanks should save cool downs for each Thunderous Blast. Tanks will explode and deal damage to the raid based on how much damage Raszageth does during the 2 second cast.
Heroic Changes
In Phase 1, Static fields grow larger the more they are used. Drop them as far away as possible and use them as sparingly as possible.
Volatile Sparks now must be killed, purged, or interrupted twice in all phases they appear in.
Storm Ruiners will debuff players during Intermission 1, requiring groups to stay fairly spread while killing their adds.
Crossing Positive and Negative charges in Phase 2 is now raid wide damage, not just the 2 people that messed up.
There are multiple Stormfiends in Intermission 2, and they must die at the same time otherwise the 2nd enrages.
In P3 Raszageth introduces Magnetic Charge. A debuff that pulls the entire raid to the afflicted player when it expires. Run this as far away as you can safely.
Conclusion
And that is the end of the Vault of the Incarnates! I hope these guides have helped, and I hope you are prepared for what’s to come! If you have any feedback, please let us know!
Was this guide helpful? Were you able to overcome the struggles of Raszageth, the Storm Eater? Let us know, and check out our Vault of the Incarnates Overview Here!