
Grrr MEAT!!! Ohh those rascally gnolls are trying to eat people again! Time for brave adventures to dive into Brakenhide and rescue the walruses and slaughter the knolls.
Brakenhide Hollow is one of the dungeons in season two Mythic+ rotation. It is a dragonflight dungeon that people have been able to do on normal, heroic and mythic. This season you will also be able to conquer it in M+ as well. This guide is here to help you win the day and time your keys.
You will have 36 minutes from the time you start your key to get 100% and kill all 4 bosses.
Tuskarr Rescue Event
When you begin the dungeon you will need to rescue 5 Tuskarr that are around the map from cages they are locked in. You will be able to see them on the mini map as a small gold circle. There are more than 5 scattered about but you only need 5.
During your rescue attempts you will face a lot of trash packs that will require killing. There are a few notable mobs that require focusing or special attention so your group does not wipe. These mobs are:
Decay Speaker – Spell casters that will use a Rotchanting Totem that buffs other mobs increasing their damage and adding a unique spell to Trickclaw Mythics. The Decay Speaker will also cast Withering Burst which puts a dot on every party member. This should be your main focus target!
Bracken Warscourge – This mob is a nightmare and has 3 very strong abilities each effecting your party tactics differently. Firstly it has a passive aura called Pack Tactics which increases all damage of its allies as well as reducing the mobs cooldowns meaning they will do special abilities more often. Secondly, it is absolutely critical that your party interrupts Hideous Cackle. This is a party wide fear that will most likely cause a wipe. It is interruptible, make sure you do it. Lastly it will do Ragestorm , this is a channel whirlwind ability that is uninterruptible. However it can be canceled with sooth abilities such as hunters tranquilising shot and druids sooth.
Hackclaw’s War-Band
Once you have rescued the Tuskarr, the main gate leading further inwards will open and the 3 bosses will run out. These are together and must be fought together.

Make sure you interrupt Tricktotem’s Greater Healing Rapids!
Run away from Rira Hackclaw’s bladestorm, he is slow when casting it so it is easy to dodge.
When the Hextrick Totem spawns make sure you nuke it as it will CC one of your party for a full 15 secs!
When one of the bosses reaches 15% they will cast Bloodfrenzy which is similar to bloodlust buffing them all by a large amount. Try and cleave all three down together so one does not have it for an extended period making the fight more difficult.
Gutshot
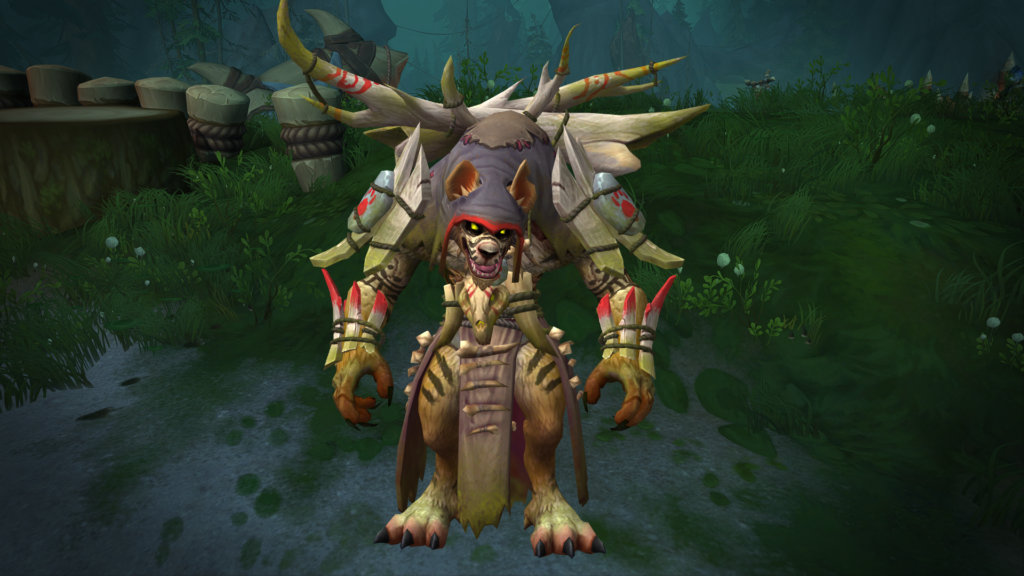
Once you have killed Hackclaw and his merry band you will move further into the dungeon coming across new and dangerous types of enemies. The most dangerous of these will be the Rotbow Stalker.

Rotbow Stalker – These mobs have the Pack Tactics passive aura again buffing all nearby allies to it. It will also shoot random party members leaving a nasty bleed on them. Make sure you dodge its frontal which is Bone Bolt Volley. Finally it will throw rancid meat at a random party member called Scented Meat. The party member hit is then focused by every beast type enemy in range during the debuff time.
WARNING!! There is an area just after the first boss that appears to only have 1 gnoll in and lots of traps. This area in itself is a trap!! As soon as the mob is engaged in combat the gates on both sides of the arena close, locking players inside or slow party members out. 6 more gnolls will stealth attack your tank leaving a nasty dot. Heal the tank to 90%+ to remove it.
Gutshot
Once you have made it past all the trash and traps you will cross a bridge and find a gnoll with 2 hyenas. This is Gutshot, the next boss.
Gutshot is much like the trash mobs Rotbow Stalkers. He has a passive aura buffing his hyenas with him.
Focus on killing the hyenas quickly. Gutshot will throw meat at a random party member making all hyenas in the area focus that party member and chase them down.
Gutshot will periodically call 2 more hyenas to him during the fight, you can quickly become overwhelmed with them so make sure you kill them quickly to keep it under control.
Avoid the traps on the floor. You can kite the hyenas over the traps on the floor to root them for several seconds.
Treemouth
After defeating Gutshot and his companions you will make your way towards Treemouth, the third boss. On your way you will face mostly the same type of mobs you have already encountered thus far, however there will be a unique enemy blocking your way across a bridge just before Treemouth. This is a mini boss type mob with a unique name, Stinkbreath.
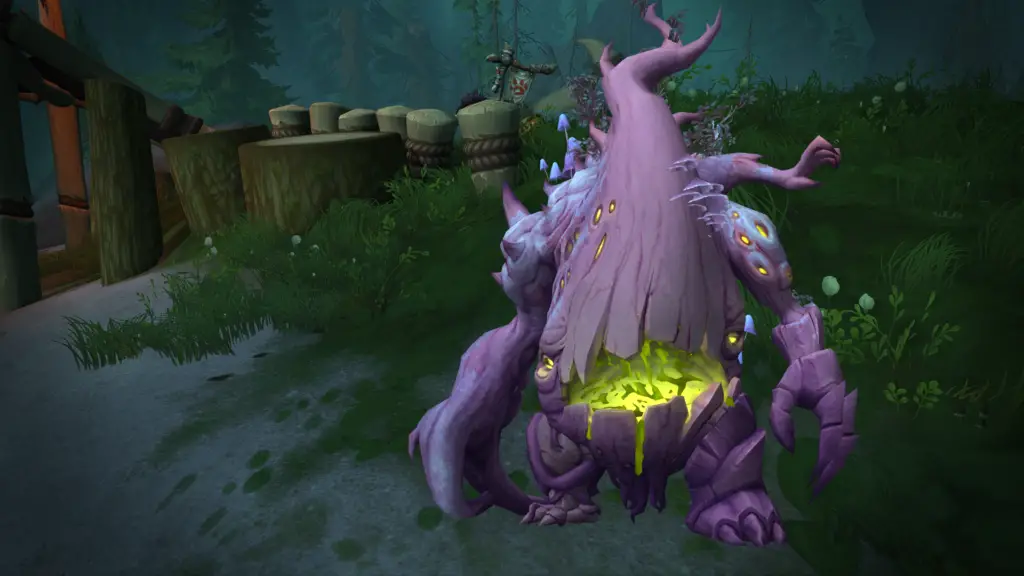
Stinkbreath – Living up to his name this gnoll does a frontal cone towards a random party member that will disorient any players hit by it. It is called Stink Breath. He will also cast Violent Whirlwind that knocks players back and deals damage. Take care he will knock you off the bridge if caught in it!
Personally I enjoy this fight. It’s a good zug zug me dps fight.
Tank always face the boss away from the party to avoid hitting anyone else with Decay Spray. It focuses on the tank and will follow him if you move about.
After the boss casts Decay Spray it will spawn 4 Decaying slimes on a random Party member. Focus kill them quickly. When they die they leave a poison puddle on the floor. Avoid standing in it.
At 100 energy Treemouth will cast Grasping Vines. This pulls all players towards the boss. When it finishes casting he will eat the closest player to him. He then gets an overshield that needs to be destroyed. When the shield is destroyed the eaten player is released.
Rotate who is being eaten by treemouth as you get a debuff after being eaten once.
TIP. You can still cast your abilities and dps when you have been eaten.
Someone should always be eaten! If no one is within a 10 yard range Treemouth will instead get a massive buff for the remainder of the fight. Starving Frenzy.
Decatriarch Wartheye
On your way to the final boss you will meet some new enemies, the most notable of these are: Fetid Rotsinger and Vole Rothexer.
Fetid Rotsinger – Has pack tactics again. Make sure you interrupt Burst of Decay and kill the Summon Totem as soon as it spawns to prevent more damage on the party.
Vile Rothexer – Spread out to avoid spreading Withering Contagion more than necessary.
The entire party should avoid the Choking Rotcloud which will slowly rotate around the boss arena you are fighting in.
Focus and kill the Rotburst Totem! It does continual party wide damage increasing the longer it is alive for.
Route Planning
I advise checking the route each week on sites such as Raider.io. These routes are updated weekly depending on the affixes for that week.
Suggested Addons
Mythic Dungeon Tools, gives you the power to create your own routes and check the % of each mob.
MythicPlusTimer, great addon to track % of mobs and the time you have left.
Bigwiggs / Littlewiggs , boss addon that tracks what needs interrupting and when a boss ability is incoming.