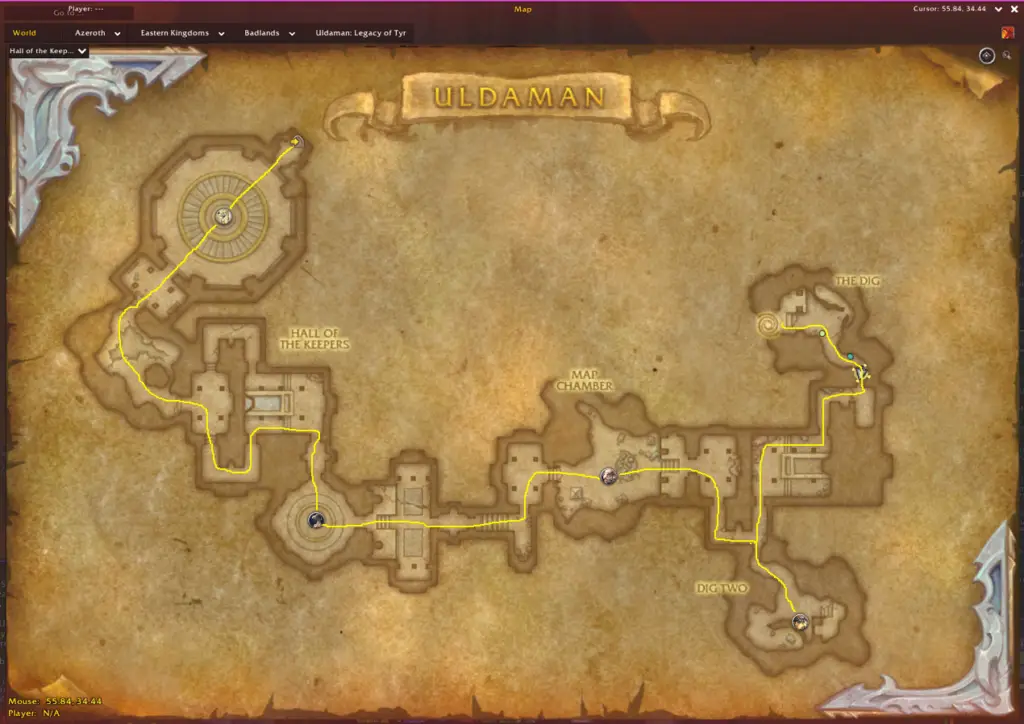
Uldaman Legacy of Tyr, found within the Badlands, Eastern Kingdoms. Luckily this dungeon uses the same Map as the original. Alexstrasza discovered another one of the Titan discs inside. With our heroes, we will recover the disc and protect the contents. This World of Warcraft Uldaman Guide will help you and your friends clear this dungeon. Let’s get started. Explanations ahead.
Coordinates for the dungeon: 41.22 10.20
Normal & Heroic Uldaman Dungeon Guide
Normal rewards 250 item level gear. Heroic will reward 359.
From the start of the dungeon just follow the trash mobs. This instance takes place within the same Uldaman we are all familiar with from past WoW expansions. Luckily there aren’t any puzzles or things to figure out. Instead WoW have given us a nice linear dungeon to complete.
With all mobs that you fight, be prepared to interrupt and stun. As there will be a multitude of abilities to be prepared for.
The Lost Dwarves
This boss consists of the three dwarven brothers. Eric, Olaf and Baelog. The brothers will attack and fight you until roughly 10% health. When this happens they will adjourn to their longboat for the second phase of the attack. Caution for the many AoE attacks and defenses they will throw about.
- Olaf
- Defensive Burwark
- Olaf will leap to one of his brothers to protect them. 75% Reduced Damage within this area. This can be interrupted. Focus all Kicks on this ability.
- Ricocheting Shield
- Olaf throws his shield at a player this will then hit any player within 5 yards of the first player. Stay a distance from each player to avoid unnecessary damage.
- Defensive Burwark
- Eric
- Skullcracker
- Eric will charge to a target location inflicting damage and disorienting all players within 5 yards of the location for 3 seconds.
- You should be spread out for Defensive Burwark. This should have minimal damage.
- Dagger Throw
- Eric will throw his dagger inflicting 100% of normal damage to one player.
- Skullcracker
- Baelog
- Heavy Arrow
- Baelog will aim and fire an arrow in a straight line. Inflicting 20k damage to players in the way. This will also knockback all players struck.
- Tanks should be facing this boss away from the party as the Heavy Arrow fires towards the tank first.
- Wild Cleave – Tank Mechanic
- Baelog will inflict 20k damage to players in front of him.
- Heavy Arrow
- Longboat Raid:
- They will all get on the Longboat which can fly around the map Searing Cannonfire at a target’s location. It is recommended to be stacked, and move slowly together to “save” space. This will continue until the bosses have been defeated.
Bromach
This is the second and one of the easier bosses in the dungeon to battle.
- Bromach
- Call of the deep
- This summons Stonevault Geomancer and Stonevault Ambusher.
- LoS these mobs to the tank as they like to stay ranged. Interrupt and Knockbacks to prevent their casts.
- This ability will be cast first!
- This summons Stonevault Geomancer and Stonevault Ambusher.
- Thundering Slam
- Avoid this ability as it deals big damage. There is plenty of time to react to the cast.
- This ability is cast occasionally.
- Quaking Totem
- High priority focus! The longer this is up the more damage it deals to the party,
- Destroying the Totem will cause all Troggs to be stunned for 8 seconds.
- Bloodlust
- The boss will become enraged and hit harder.
- Not Interruptible. However Enrage can be dispelled. Tremor also stop bloodlust.
- The boss will become enraged and hit harder.
- Call of the deep
Whilst this boss doesn’t have many mechanics. There are a few things to watch out for. Providing the tank is aware of their surroundings everything should be okay.
Sentinal Talondras
This boss whilst not having many mechanics which is not unusual for World of Warcraft does pack a punch!
- Sentinal Talondras
- Ancient Dynamo
- This is a slightly complicated mechanic if you cant understand how it works.
- At the fight start the boss will have 2 stacks of inexorable. This gives her immunity to all stun effects.
- Tanks must move this boss into Resonating Orb twice before she casts Titanic Emporwerment.
- Resonating Orb
- 3 zones will spawn on random player locations. This will stun players. However the boss must be moved into this zone.
- Titanic Empowerment
- She will cast this mechanic at 100 Energy. If you don’t clear her stacks of Inexorable she will cast the empowerment and become enraged.
- Earthen Shards
- This is a Bleed Effect! It will be cast on random party members. Healers will need to use cooldowns here.
- Use defensives if you get this cast on you.
- Ancient Dynamo
Emberon
The journey to Emberon will become increasingly harder with trash mobs gaining more abilities so be prepared with knockbacks and stuns. Use the GCD to your advantage. (Global Cooldown)
- Emberon
- Active Keepers
- Emberon will cast this ability when engaged. The Golems around the room will engage casting Seeking Flame.
- These are not attackable until the boss is Phased.
- Dodge the flames. But its not difficult as they rotate around the room slowly.
- Immunities allow you to soak. Paladin Bubble or Rogue Cloak of Shadows.
- Unstable Embers
- This is cast on random players.
- A fire damage dot will target one player and spread to all players within 7 yards.
- Be spread out. Healers can easily manage this ability in N or H.
- Sacred Barrier
- This Aura is cast during the bosses intermission phase.
- Once he reaches maximum energy he will cast Sacred Barrier preventing all damage to him..
- Do not stay in the middle. Heat Engine will cause fire damage and a knockback to players.
- This phase will end once you have defeated 4 keepers.
- Every 3 seconds the boss will cast fire wave during this time. Causing fire damage over 3 seconds to the party.
- Lava Beams
- This is active during intermission so keep moving around. (Mechagon Garden Boss)
- Blink does work to move through the beam with 0 damage.
- Searing Clap
- Frontal Damage cast upon the tanks direction
- Tanks should aim this away from the party.
- Burning Heat
- This is a Dispelable DoT ticking for fire damage.
- Healers should dispel immediately.
- Active Keepers
Whilst this boss seems complicated its overly simple. Avoid stacking and watch out for fire. Many players have succumbed to fire before you and sure many will after you. But be aware of your surroundings to win.
Chrono-lord Deios
Standard Dragon Rules Apply!
DPS & Healers: Do not stand under the Wings, near the tail, or in front of the boss. Spread underneath or at range.
- Chrono-lord Deios
- Intermission once he reaches 100 energy
- His energy will decay from 100 to 0. Each time this goes off he casts Rewind Timeflow,
- Rewind Timeflow
- This ticks damage over time to the party. Players should stand in the Temporal Zones on the floor.
- Temporal Zones
- These grant 30% Haste to players whilst active.
- Eternity Orb
- A sand orb will fall from the sky. Players should dodge the swirly (unless achievement hunting in Mythic)
- This causes player wide damage if it strikes a target.
- Eternity Zones will spawn where the Orb strikes.
- Eternity Zone
- DO NOT STAND IN THIS ZONE
- These will cause player wide damage and reduce your haste by 30%!
- Sand Breath
- This should only affect the tank. Ensure not to face him towards your ranged party members.
- Intermission once he reaches 100 energy
Whilst he has few mechanics the zones on the floor do look similar. Some trial and error is expected. Whilst learning this fight on Normal or Heroic wont cause issues, mythic difficulty might.
Mythic Uldaman Dungeon Guide
Items dropped in Mythic difficulty are 372 Item level.
Mythic dungeons add more abilities to the bosses. World of Warcraft is praised for having the extra difficulties for players to receive a challenge.
The Lost Dwarves:
This boss will gain an extra mechanic where each blast of Searing Cannonfire will leave Burning Pitch on the ground. Burning Pitch will remain for 30 seconds.
Healers beware of Fiery Surge. Each time the boss fires Searing Cannonfire it will cause party wide damage.
Bromach
Tremor is limited to 8 yards. Your tank should ensure the Bromach and adds are positioned nearby for its destruction. While stunned, targets his take 200% increased damage for 10 seconds.
Sentinal Talondras
On Mythic, the boss gains Unrelenting this effect will stack.
Unrelenting will occur after the following:
- Titanic Empowerment cast goes through.
- Recovery from Stun effects.
Unrelenting is an enrage. Save cooldowns for this to remove as quickly as possible.
Emberon
Unstable Embers targets all the players, so it is extremely important to be spread and never overlap each other with the surrounding circle. This is a great place to use your personal defensives.
Chrono-lord Deios
Chrono-Lord will cast Time Sink.
This magical debuf will affect a random player. When its dispelled it will trigger Time Eruption.
Time Eruption will deal damage to the affected player. Be ready to heal as soon as you dispell.
WoW that’s a fact!
Neglected Mole Machines
Within Uldaman: Legacy of Tyr, there are three unique checkpoints hidden within the map. Allowing players ease of access if you die to teleport forward.
- Upon defeating Bromach. On the right you will see the first mole machine, named “Alpha”.
- After defeating Emberon. Within the cave you’ve just cleared you will find “Beta”.
- The last checkpoint is found at the end of The Earthworks. This teleport does not activate until you first pull Chrono-Lord Deios.
Glory of the Dragonflight Hero
Glory of the Dragonflight Hero is a continuation onto the Glory achievements for each expansion. World of Warcraft rewards cool mounts for completing all of the dungeon achievements for the expansion. Have some fun in Mythic Difficulty and get yourself some achievement points.
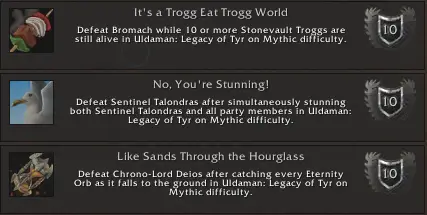
- No You’re Stunning!
- Defeat Sentinel Talondras after simultaneously stunning both Sentinel Talondras and all party members in Uldaman.
- Like Sands Through the Hourglass
- Defeat Chrono-Lord Deios after catching every Eternity Orb as it falls to the ground in Uldaman.
- It’s a Trogg Eat Trogg World
- Defeat Bromach while 10 or more Stonevault Troggs are still alive in Uldaman
If there are any discrepancies with the tactics and or abilities please get in touch below.
Make sure to keep Battle-shout bookmarked to keep up with future articles!
Join our Community Discord!