Not the boss you’re looking for? Check out the Vault of the Incarnates Overview for a list of all bosses and guides!
Introduction
Broodkeeper Diurna. Perverter of Dragon Kind, and traitor to her flight. This guide is aimed at helping normal and heroic level encounters. This 2 phase fight will test your raids ability to coordinate 2 groups at the same time, as well as Add Management and Positioning. Check out this quick guide for Broodkeeper Diurna below!
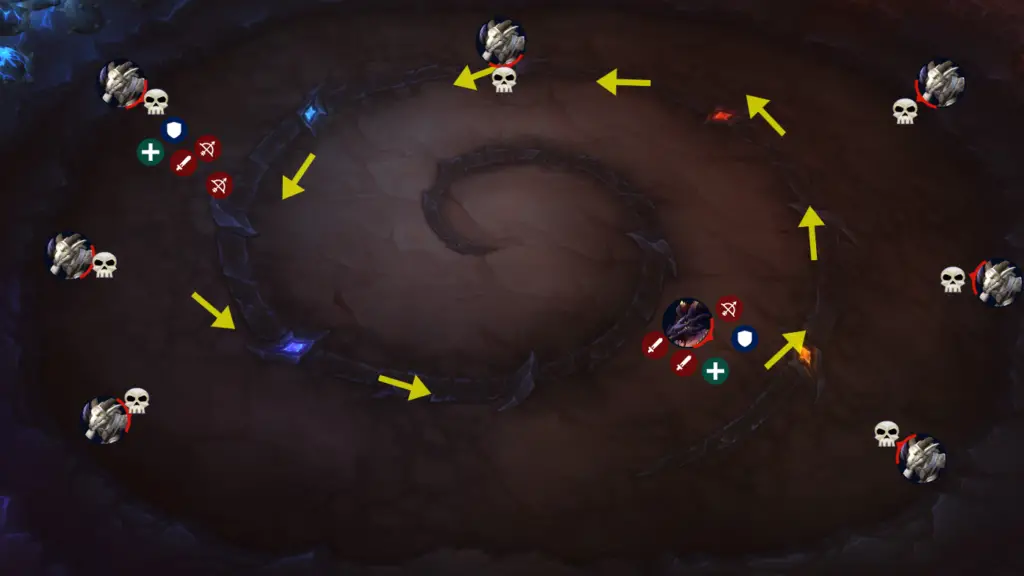
The first phase consists of destroying a clutch of twisted eggs while a some of your raiders (Tank included) defeat waves of adds.
The 2nd phase becomes a DPS race against the boss as she enrages at the fall of her clutch!
Positioning
This boss moves. Like, a lot. The group focusing the Adds will be bouncing between various points killing adds to prevent them from reaching the Boss and receiving her boon. The group killing the boss and destroying eggs will be constantly rotating in an attempt to dodge adds and break eggs!

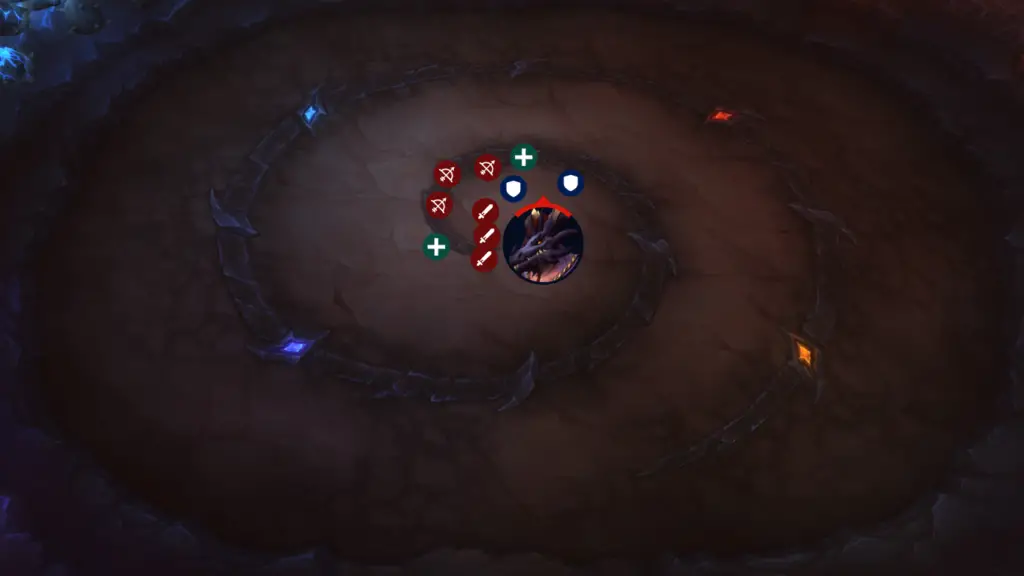
In phase 2, the movement will finally cease for the most part. Well, except for dodging mechanics, but no more chasing adds!

Important Abilities
This section is going to be broken into a few sets. Phase 1 Boss, Phase 1 Adds, and Phase 2.
Phase 1 Boss
Broodkeeper will periodically slam her staff into the ground. This staff will deal damage to the entire raid for 9 seconds, or until all charges on the staff are depleted. Players can move close to the staff to gain an extra action button. Using this button will drain 1 stack and afflict a player with Greatstaff’s Wrath, and lightning will begin to chase the player. Drag this lightning over eggs to shatter them. Prioritize Eggs that are getting ready to hatch.
Broodkeeper will use Rapid Incubation on 2 eggs at a time, use the lightning from Greatstaff’s Wrath to break them before they hatch, otherwise your Add tank will be very upset!
Broodkeeper will shoot wildfire at players randomly. We all know to dodge the fire, don’t we? Dodge it.
Broodkeeper can cast an Icy Shroud on players nearby. It is a slow and a healing absorb. It can either be dispelled or healed off. This should be removed quickly to facilitate egg smashing and fire dodging!
Phase 1 Adds
Add group has it a good bit easier this fight, albeit on a timer while having a space limit. If any of these adds come within 50 yards of the boss, they gain health and damage buffs and will easily overcome the raid.
Earthreavers, don’t stand in front of them. They do a stunning cleave.
Juvenile Frost Proto-dragons, focus them down quickly to prevent their tantrums.
Flamebenders, summon swirling beams of fire that you will need to dodge in order to prevent damage.
Legionnaire, will cast a Thrust that targets nearby players. This should always be the tank, otherwise a poor DPS is going to have a bad day.
There are a handful of Minor adds, that boil down to interrupt, stun, and cleave.
Phase 2
Broodkeeper receives empowered effects on most of her abilities, but adds stop spawning. Once phase 2 begins, she gains a stacking buff increasing her damage done by 15%, and gains a stack every 30 seconds.
Staff changes: Instead of interacting with the staff, it now randomly targets players to chase with lightning and deals significantly more damage, and CANNOT be ended early. Dodge the lightning and do not drag it through your team.
Icy Shroud changes: It is now a Frozen Shroud. Players will be frozen in place and their is a DoT to accompany the healing absorb, making removing the debuff imperative.
Wildfire: Now more fiery. After players take damage from the initial blast, the fireballs will bounce and leave exploding spots in secondary locations. Continue to dodge the fire.
Role Specific Mechanics
Tank
In phase 1, tanks should coordinate with each other about positioning. You do not want the adds getting too close, and 50 yards is not nearly as much as you think.
In phase 2, tank swap after each cast of Mortal Stoneclaws. It can be solo tanked in phase 1, but due to increased duration it’s a pain in phase 2 and will begin to stack.
Heals
Pay attention to what abilities are being cast, and be ready to clear Icy Shroud and Freezing Shroud debuffs. If you cannot kill your own ice, call for a DPS to assist you.
DPS
You want to do as much damage as quickly as possible to adds with the fewest number of players possible. Having enough damage to the boss is very important, otherwise her health may not be low enough by the time she transitions or the eggs are broken.
Stay loosely spread.
2 dps should always be using the staff in phase 1 to shatter eggs, preferably classes that can cast and move.
Heroic Changes
On heroic Greatstaff’s Wrath gains a 10% damage buff every time it is cast, making phase 1 a race to break all eggs before the staff begins to deal too much damage.
Diurna will deal raid wide damage every time an egg is shattered, and gains a buff increasing this damage for 10 seconds. Try to not overlap too many eggs at once.
Adds have a few changes too:
- Earthreaver: Anti-tank attack. Must be killed quickly or it will shred the tanks armor.
- Flamebender: Cauterizing flames. Will deal damage and heal the flamebender for a considerable amount.
- Frost Dragon: Stacking bleed to targets it melee attacks
- Stormbringer: Stuns random enemies for 2 seconds, and grants nearby allies 30% movement speed.
Conclusion
This is a fairly long and intense fight. Ultimately, if you manage to defeat the Broodkeeper you can access Raszageth herself. You’ve come too far to stop now heroes! Quickly, before she breaches the prisons!
Was this guide helpful? Were you able to overcome the struggles of Broodkeeper Diurna? Let us know, and check out our Vault of the Incarnates Overview Here!


